Crafting a React/Next.js Single Page Application Optimized for SEO
What's the first thing you do when you are looking for something?
If you're like me, you probably pull out your phone and search for it on Google. It makes optimizing websites for search engines more important than ever. And as a developer, I get it, SEO is a critical part of any business’ online presence. It's my job to be sure our tools can support that effort of being easily visible on search engine results pages.
And since React is the most popular JavaScript framework, these tools will most likely be related to it or React frameworks like Next.js.
But, how can we be sure our React dynamic applications are SEO-friendly for our favorites robot crawlers to understand?
That's when the real work comes in. Stop googling: "SEO with react" 'cause you're are at the right place to get started, my friends!
It’s exactly what we'll explore today. How Next.js can help give an SEO boost to our React-powered SPA.
In a rush? Skip to tutorial steps.

In this article, I’ll walk through the following:
What’s a SPA?
What are the challenges with SPA SEO?
Why is SEO important?
What is Next.js?
How to get started building SEO-friendly React apps with Next.js?
For more tech-agnostic info about single-page application SEO, check out this in-depth guide.
What is a SPA?
A SPA (or Single Page Application) is a type of web application that provides a dynamic and interactive experience all from one point of entry.
Traditionally, you might be more familiar with a server-side approach, where each page of your website has its own “route” (or page URL), but with a SPA, you have a single route that loads up the entire website in the browser using JavaScript.
It’s a little easier to get your head around it with an example. If you’re building a React application, React needs to "mount" onto a page element. You can do this by serving a page like index.html to your visitor, then in the browser, React will provide that mounting action based on your instructions.
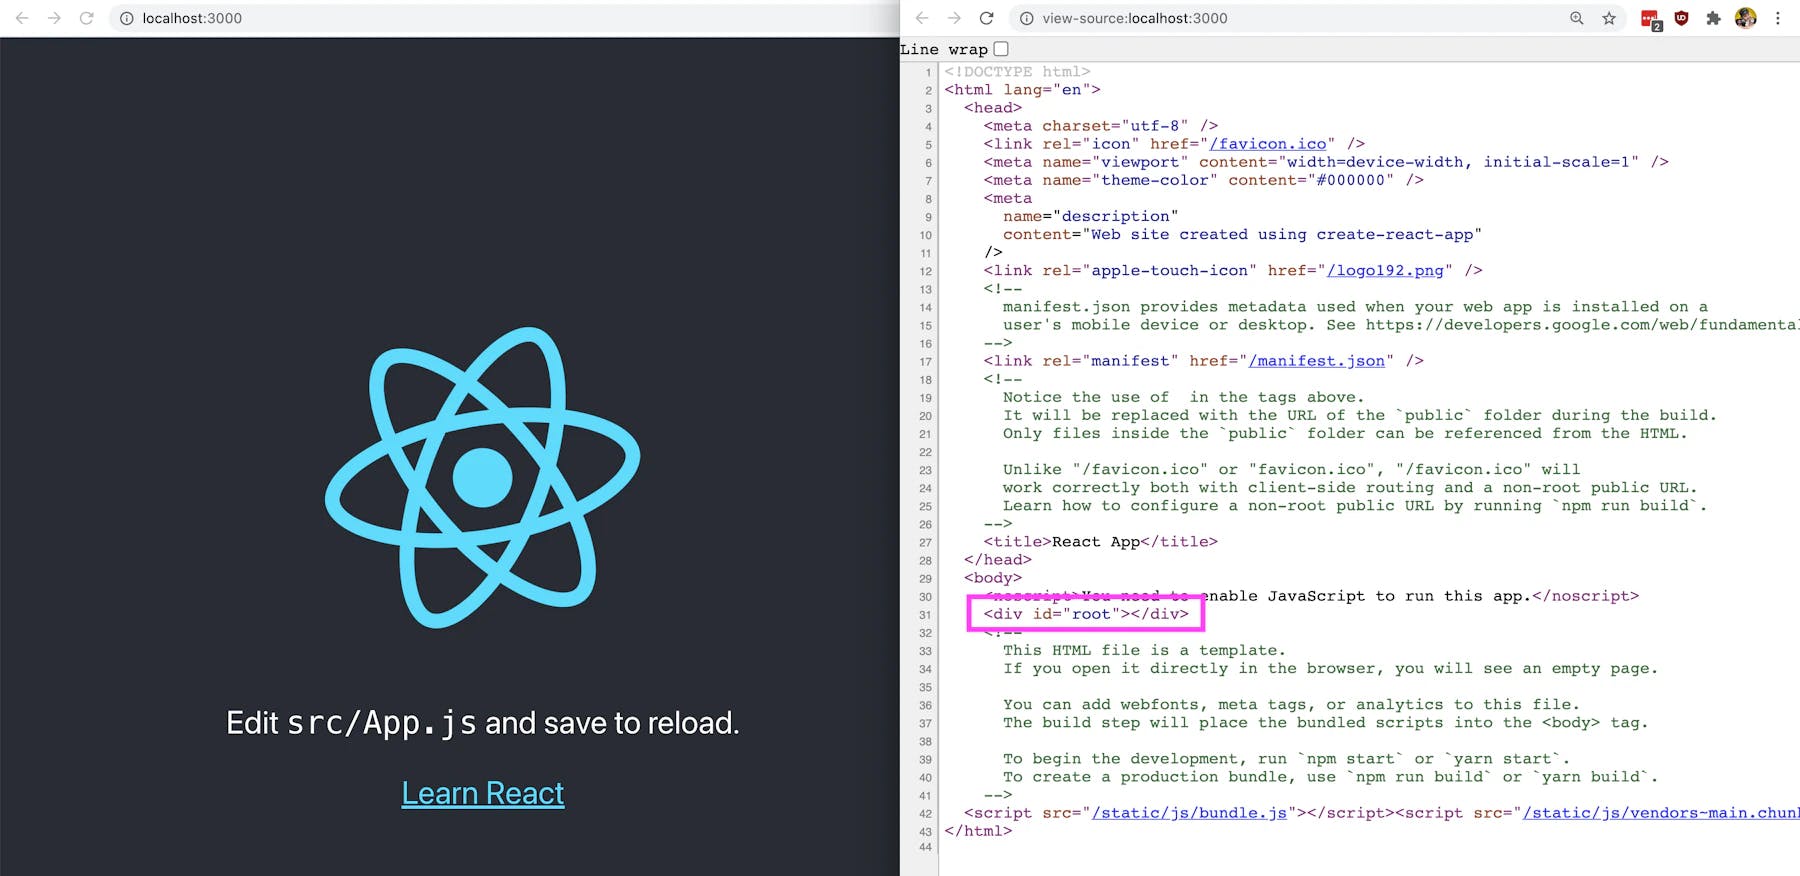
Once that page mounts, React kicks in and enables you to do whatever you want. Whether it’s providing simple things for the visitor to interact with or providing some routing mechanism to change pages, in this example, that entire experience originated from that single page.
What makes single-page application SEO challenging?
Part of the issue of serving an entire application based on a single entry point (index.html) is when Google is trying to look at that URL, they’re only ever going to be able to see the content and metadata from that single initial page.
This limits what pages you can make available to Google, ultimately hurting your ability to index more content. It’s that indexed content that makes your website or application discoverable by search engines.
Also, traditionally, a single-page application leans heavily on JavaScript to provide a dynamic experience. For many simple use cases, this might be completely fine, as Google can support a limited amount of JavaScript when crawling the page, but this isn't true of all search engines.
With these challenges, we start to lose our competitive advantage when trying to make use of one of the biggest potential traffic sources on the web.
Why is SEO important?
SEO (Search Engine Optimization) is the practice of helping search engines more easily read and understand what your website or application is about.
This is critical if your goal is to bring as many people as you can to your website. The goal of people researching on the internet is to ultimately find something, and that something can be your business or the content you’re trying to promote. More traffic (visitors) means more potential sales (or customers) for your business.

Search engines are constantly getting smarter, with hardworking teams at Google, Bing, Duck Duck Go, and other engines constantly fine-tuning search algorithms. But we wouldn’t need to write this article if they were perfect. While they might be able to figure out what your blog post is broadly about or what types of products your business sells, it’s limited by what information you provide and how you provide it.
If you’re solely relying on a SPA that is hard to crawl and doesn’t give much information on that first and only page that Google can see, you’re missing out on potential opportunities. People could have found your content instead of your competitors when searching.
What is Next.js, and how does it help with SEO?
The awesome thing about the web is that not only are search engines getting smarter, but the tools we can use as developers are becoming more mature. It gives us ways to solve our SEO needs without sacrificing any functionality that makes a SPA great.
Next.js is a web framework that sits on top of React, providing a bunch of features out of the box that can take our applications to another level.

In the example of our traditional SPA, we had a single index.html file. React would mount the application in the browser and handle any interactions and page navigation in that file.
A different approach would be to have .html files for all of our pages. For each visited page, React would mount the application and content for that particular page (e.g., About page, Contact page) rather than loading from the initial homepage.
To do that, Next.js has a few different techniques and APIs that developers can interface with to make sure we’re providing as much SEO value as we can.
Static Site Generation
Static Site Generation (SSG) is the practice of pre-rendering some or all of the pages of a website/application ahead of the browser at compile time. The index.html would include most, if not all, of the experience that will get loaded in the browser.
This works wherever the website or application is compiled from, that server or environment will bring in any data sources and use React to build the website just like it would inside the browser, but export it into an HTML file. This file would then get served to the visitor.
React would still “hydrate” the page and provide the ability to add a more dynamic experience. However, by pre-rendering, you’re able to reduce the amount of work the browser has to do to get your visitor the experience you want to give them.
Each of these pages is located in individual “routes,” like mentioned before. Visitors, or in our case, search engine crawlers, would then be able to go directly to the page and see the content specific to that page.
This means that not only can we have page-specific metadata, like a title and description, but the search engine can also read and understand that page’s content and recommend it to people based on their searches.
Nevertheless, rendering pages at compile time comes with its limitation. The information that can be sent immediately to the browser is limited because of its static nature. While we can still load that dynamically in the browser, some use cases may need a completely dynamic experience that could be challenging to accomplish.
Server-side Rendering
Server-side Rendering (SSR) provides a similar concept to Static Site Generation. Still, instead of compiling each page ahead of time into static files, that experience will be rendered by React at request time. For instance, if your visitor is trying to visit the Contact page (/contact), the server will recognize the route that is being visited, fetch all information related to that page, compile the HTML, and return it as part of the initial response.
Similar to SSG, using this technique, you can leverage the ability to provide page-specific information and context to both our visitors and search engines. This way, we make sure our content is as searchable as it can be.
While both options work well for providing good SEO, there are some tradeoffs with SSG and SSR. We won't get into this article, but it should be considered when making the decision for your website or application.
Next.js Head Component
Regardless of the option you choose, a challenging part of using tools like React for building a web page is that these applications get mounted into the of an HTML page. This means that you don’t have direct access, without additional tools, to make any changes to places like the of a website. It’s traditionally where a lot of key metadata lives for describing your content to search engines.
This includes things like your title, description, and any Open Graph data:
<title>Add a Shopping Cart to Any Website in Minutes - Snipcart</title>
<meta name="description" content="Add a shopping cart to your site in minutes. Works with any site builder, CMS, and framework. 20 000+ merchants trust our e-commerce solution for their website. Join them!">
<meta property="og:title" content="Add a Shopping Cart to Any Website in Minutes - Snipcart">
<meta property="og:description" content="Add a shopping cart to your site in minutes. Works with any site builder, CMS, and framework. 20 000+ merchants trust our e-commerce solution for their website. Join them!">
<meta property="og:url" content="https://snipcart.com/">
<meta property="og:type" content="website">
Luckily, Next.js ships with a Head component out of the box that we can leverage to make sure all of our pages include those important details that need to get rendered into our page.
You can first import the head component to make it work, then include it as a child of a Next.js page. You can then add anything you want to the Head.
function IndexPage() {
  return (
    <div>
      <Head>
        <title>Add a Shopping Cart to Any Website in Minutes - Snipcart</title>
        <meta name="description" content="Add a shopping cart to your site in minutes. Works with any site builder, CMS, and framework. 20 000+ merchants trust our e-commerce solution for their website. Join them!">
        <meta property="og:title" content="Add a Shopping Cart to Any Website in Minutes - Snipcart">
        <meta property="og:description" content="Add a shopping cart to your site in minutes. Works with any site builder, CMS, and framework. 20 000+ merchants trust our e-commerce solution for their website. Join them!">
        <meta property="og:url" content="https://snipcart.com/">
        <meta property="og:type" content="website">
      </Head>
Next.js will recognize that metadata and do the hard work of lifting it up to the right location in your HTML document when the page is being rendered.
This lets us end up with both the power of dynamic React pages and the ability to craft that information for Google carefully!
Getting started with building SEO-friendly React apps with Next.js
Now let’s see how this works in action!
Feel free to follow the steps in this video!
If you enjoy this, feel free to like, share & subscribe to his channel! :)
We’ll start by building a React application from scratch then using the Next.js Head component to add metadata to our pages.
Because we gain the ability to manage that metadata through various pages with Next.js, we’ll look at how we can customize it for new static pages and generate that metadata for dynamic pages.
Step 0: Creating a new React app with Next.js
We can start by creating a new Next.js application from scratch using Create Next App.
In your terminal, run the following command:
    yarn create next-app my-seo-app
    # or
    npx create-next-app my-seo-app
Note: you can update
my-seo-appto whatever name you'd like to give the project.
After running this command, Next.js will make a local copy of a starter application template and install the dependencies to get the project ready to go.
Once it’s finished, you can navigate to that directory:
cd my-seo-app
Then you can start up your Next.js development server:
    yarn dev
    # or
    npm run dev
When loaded, Next.js will let you know the server is running at http://localhost:3000. If you open that up in your browser, you can see your new Next.js site!

At this point, feel free to look around the code inside of your new project and get ready for the next step!
Step 1: Updating Next.js homepage SEO metadata
When creating a new Next.js application, the framework starts with a homepage that includes some sample content.
Additionally, its conventionality includes the Next.js Head component out of the box, first imported at the top of the file:
import Head from 'next/head'
As well as a few sample pieces of metadata:
<Head>
  <title>Create Next App</title>
  <meta name="description" content="Generated by create next app" />
  <link rel="icon" href="/favicon.ico" />
</Head>
We’re making our Head component available in this instance, then adding a title, description, and a favicon. If we view this page's source code in the browser, we can see this metadata as well as other things that Next.js is managing for us:

If we wanted to update this with our own title and description, we can easily do so by simply changing those values:
<Head>
  <title>My Clothing Store</title>
  <meta name="description" content="Come to my store for great apparel!" />
  <link rel="icon" href="/favicon.ico" />
</Head>

As we can see, Next.js is now using the values that we updated in our code.
We can even change the image for our favicon located at public/favicon.ico or completely change the link!
If we wanted, we could also add more fields, such as the Open Graph title and description we saw earlier:
<Head>
  <title>My Clothing Store</title>
  <meta name="description" content="Come to my store for great apparel!" />
  <meta property="og:title" content="My Clothing Store" />
  <meta property="og:description" content="Come to my store for great apparel!" />
  <meta property="og:url" content="https://myclothingstore.com/" />
  <meta property="og:type" content="website" />
  <link rel="icon" href="/favicon.ico" />
</Head>
And just like before, Next.js updates that metadata.

This gives us the ability to craft our page's metadata exactly how we'd like it.
Follow along with the commit on GitHub
Step 2: Creating a new page with custom SEO metadata in Next.js
As we’ve seen earlier, one of the main benefits of Next.js, when it comes to SEO, is the ability to provide direct links to individual pages. It’s giving us the ability to customize the metadata on that page for Google and our visitors.
To do that, we can create a new page and see exactly how that works!
Create a new file inside of the pages directory called about.js. Inside pages/about.js, add:
    import styles from '../styles/Home.module.css'

    export default function About() {
      return (
        <div className={styles.container}>
          <main className={styles.main}>
            <h1 className={styles.title}>
              About My Clothing Store
            </h1>
          </main>
        </div>
      )
    }
This will create a new page called “About” at the route /about. We can test this out by opening up our browser and visiting http://localhost:3000/about.

While this page is simple, you can see that we could easily create a new page that can be accessed directly by the URL.
Since we’re still inside React, we keep the same SPA capabilities, but we can additionally create content specific to each page without sacrificing SEO or user experience.
To see how this works with metadata, let’s add the Next.js Head component. At the top of pages/about.js import the Head component by adding:
import Head from 'next/head'
Next, inside of our wrapper <div> element, let's add our Head component along with some metadata for our page:
<Head>
  <title>About - My Clothing Store</title>
  <meta name="description" content="The story behind My Clothing Store!" />
  <meta property="og:title" content="About - My Clothing Store" />
  <meta property="og:description" content="The story behind My Clothing Store!" />
  <meta property="og:url" content="https://myclothingstore.com/about" />
  <meta property="og:type" content="website" />
  <link rel="icon" href="/favicon.ico" />
</Head>
Just like on our homepage, we’re adding a title, description, some Open Graph data, and even the same favicon as before.
If we now open this up in our browser and look at the source, we can now see that our About page shows the metadata specific to that page.

By taking advantage of Next.js’s ability to have multiple pages with custom content and metadata, we’re able to help Google understand what each of our pages is about!
Follow along with the commit on GitHub
Step 3: Generating SEO metadata for dynamic pages in Next.js
Adding a new static page with Next.js is relatively straightforward. We create a new file with the route we’d like to be available and generate a React component with the content. However, dynamic pages are a little trickier in that they’re dynamic.
While we’re not going to get super deep into how dynamic pages work, we can still go through a basic example to get an idea of how we can dynamically manage the metadata on our page.
Let’s get started by creating a new folder called products, and inside of that folder, create a new file called [productId].js.
Note: that’s not a typo. The filename should have the brackets around the
productId.
This will create a dynamic route in Next.js, allowing us to manage the way multiple pages look and work by defining which pages we want available and the dynamic data inside of it.
Inside of products/[productId].js add:
    import styles from '../../styles/Home.module.css';

    export default function Product({ productId, title }) {
      return (
        <div className={styles.container}>
          <main className={styles.main}>
            <h1 className={styles.title}>{ title }</h1>
            <p>Product ID: { productId }</p>
          </main>
        </div>
      )
    }

    export async function getStaticProps({ params = {} } = {}) {
      return {
        props: {
          productId: params.productId,
          title: `Product ${params.productId}`
        }
      }
    }

    export async function getStaticPaths() {
      const paths = [...new Array(5)].map((i, index) => {
        return {
          params: {
            productId: `${index + 1}`,
          }
        };
      });
      return {
        paths,
        fallback: false,
      };
    }
Here we’re creating an example of routes inside Next.js with getStaticPaths to show how we can manage our dynamic metadata. Typically the paths would be built based on dynamic content, such as an API request or data file.
A quick breakdown of what we’re doing:
We're creating a new page with content similar to Step 2.
We’re defining getStaticProps, which takes an argument including the dynamic value of a parameter. This parameter has the same name as the filename we created,
productId.js.When receiving that parameter value, we’re defining a simple title and productId, which will be passed in as props to our page component.
We’re defining getStaticPaths, where we’re using a new array to simulate a list of dynamic data.
Note: understanding how getStaticProps and getStaticPaths work isn't critical to understanding the use of dynamic data in our page component, but it will help follow along with the example!
Save that file, restart your development server, and now open /products/5 at http://localhost:3000/products/5 in your browser.

We can see that we’re passing in the title and product ID dynamically from our page! Similarly, if we go to /products/3 (or any number between 1-5 in this example), we’ll see a similar page.
Now that we’re using dynamic data on our page, we can use that same data to create our metadata.
Just like before, first import the Next.js Head component at the top of the page:
import Head from 'next/head'
Then add the following to the page component of pages/[productId].js:
<Head>
  <title>{ title } - My Clothing Store</title>
  <meta name="description" content={`Learn more about ${title}`} />
  <meta property="og:title" content={`${ title } - My Clothing Store`} />
  <meta property="og:description" content={`Learn more about ${title}`} />
  <meta property="og:url" content={`https://myclothingstore.com/products/${productId}`} />
  <meta property="og:type" content="website" />
  <link rel="icon" href="/favicon.ico" />
</Head>
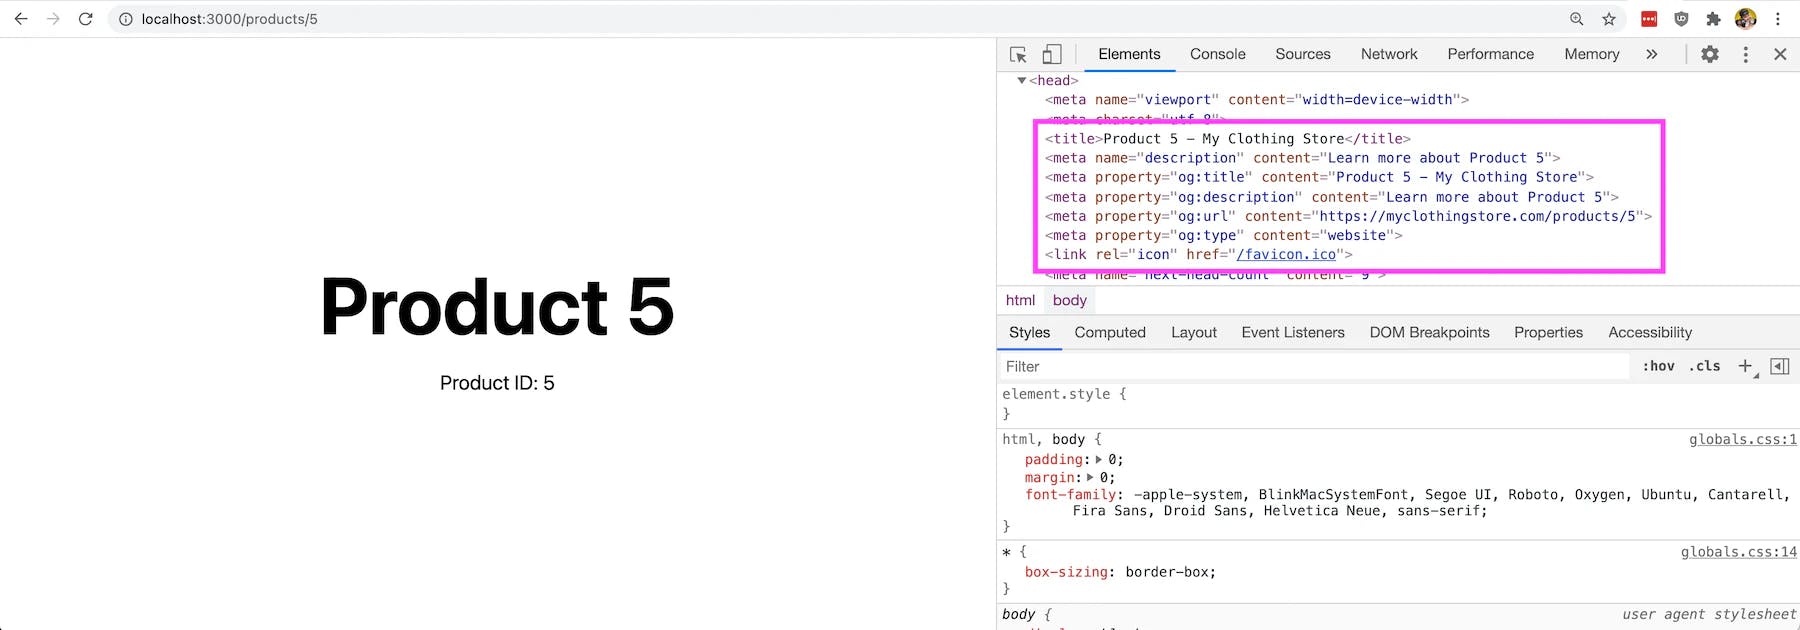
In this snippet, we’re adding the metadata to the Head component. However, this time, we’re dynamically setting all of our values’ metadata using our product’s title and product ID.
If we open up the browser, we can see that our Head has those dynamic values!
Follow along with the commit on GitHub
What else can we do for better SEO?
Using the Next.js Head component along with its page creation strategies can help us carefully craft our experience for both our visitors and Google. Still, there’s more we can do to make sure we’re always maximizing our SEO efforts.
Analyze and monitor with Google Webmaster Tools and web.dev
One of the first things we can always do is a test to make sure our website or application covers the basics.
Luckily Google provides some free tools to handle this, including the Search Console and web.dev which will also test performance and accessibility. Performance and accessibility also happen to help SEO.
Adding a sitemap
Adding a sitemap to your website probably isn’t as critical as it used to be. Google can crawl your site pretty efficiently, but it’s still a helpful way to make sure all of your content is getting hit.
While you can’t do this out of the box with Next.js, there are plugins to help, such as the Next.js Sitemap Generator or a custom approach like the one I added to my Next.js WordPress Starter.
Optimizing for social media with Open Graph
We lightly touched on Open Graph in the tutorial, but there’s a wide variety of metadata tags and use cases that make Open Graph an important part of your SEO work.
Websites like Facebook and Twitter and apps like Discord and Slack all use Open Graph tags to pull in metadata, including what the link is about and which image they show.
By optimizing your Open Graph tags, you can make sure those big images show up in social feeds whenever your website content is shared.
Closing thoughts
SEO is a critical part of bringing in traffic to your website/application and, ultimately, your business. Ensuring things are working and looking as they should is an important part of how your business appears on search result pages.
While React alone tends to struggle with providing a good overall SEO experience, we have many tools in our belt to help, like Next.js. These tools give us powerful frameworks to provide both a great experience to our customers and the search engines trying to crawl our websites.
Regardless of the tools you use, be sure to test your SEO periodically. Just like maintaining any physical aspect of a business, we want to make sure our online presence is working for us as hard as it can!
